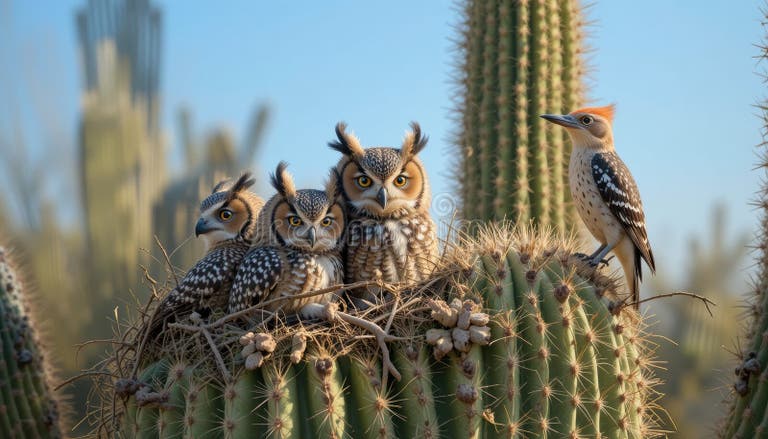
Photographing spotted owls is an exhilarating endeavor that merges the thrill of wildlife observation with the art of photography. These elusive creatures, renowned for their distinctive speckled plumage and mysterious demeanor, demand a blend of patience, precision, and technical savvy from any photographer intent on capturing their essence. To immortalize the ethereal beauty of spotted owls requires more than just a camera; it necessitates a deep understanding of gear capabilities, mastery of settings, and refined techniques tailored to their unique behaviors and habitats. This comprehensive guide unfolds the secrets behind creating compelling, evocative images of spotted owls, empowering both novice and seasoned photographers alike.
Choosing the Right Camera Gear for Spotted Owl Photography
The foundation of a successful spotted owl shoot lies within the selection of the appropriate camera equipment. Considering the owl’s natural habitats—dense forests, shaded groves, and secluded caves—versatility and adaptability become paramount. A DSLR or mirrorless camera with high ISO performance is indispensable, facilitating crisp captures in low-light environments where these crepuscular creatures thrive. A fast telephoto lens ranging from 300mm to 600mm provides the necessary reach to photograph from a respectful distance without disturbing their natural behavior.
Equally important is image stabilization, often found in both lens and in-body systems, which subdues the tremors caused by handheld shooting at long focal lengths. Weather-sealed gear can withstand the humid, misty conditions often associated with owl habitats, extending durability and reliability throughout extended field sessions. Additionally, a sturdy but lightweight tripod or monopod offers stability during long exposure shots, especially during dawn or dusk when light dwindles.
Mastering Camera Settings to Capture the Perfect Shot
Once equipped with the right tools, optimizing camera settings becomes the next critical phase. Given the spotted owl’s nocturnal tendencies and the dim, dappled light of their environments, balancing ISO, aperture, and shutter speed is both an art and a science.
Starting with ISO, it’s prudent to select the highest sensitivity your camera can handle with minimal noise—often between ISO 800 and 3200 depending on your model. This flexibility enables faster shutter speeds essential to freezing the subtle motions of the owl, from the gentle tilt of its head to the subtle flutter of feathers. Aperture settings are usually wide open (f/2.8 to f/5.6) to maximize light intake and craft a shallow depth of field, effectively isolating the owl from its often complex backdrop and creating a captivating bokeh effect.
Shutter speed generally needs to be 1/500th of a second or faster to avoid motion blur, but this can be adapted according to lighting and the owl’s activity. Employ continuous autofocus modes to maintain sharpness on a moving subject, and consider burst mode to capture a series of images, allowing for the selection of the most arresting composition later.
Techniques for Locating and Approaching Spotted Owls
Locating spotted owls entails patient reconnaissance and a profound respect for their space. These owls are masters of camouflage, often nestled high within conifers or nestled against the mottled bark of old-growth trees. Early morning and twilight hours are the best times to detect their presence, as they are more active and vocal during these periods.
Listening for their distinctive hoots or whistles can guide the photographer to their vicinity. Using binoculars before setting up the camera ensures minimal disturbance. Approaching slowly and silently is crucial; sudden movements or loud noises can easily spook these wary birds. Consider using natural cover or blinds to maintain concealment. Additionally, understanding the owl’s habitual perches and nesting sites enhances the chances of consistent, intimate portraits without encroaching on their habitat.
Lighting Strategies for Dramatic and Natural Imagery
Lighting often dictates the mood and storytelling within wildlife photography. For spotted owls, natural light is preferred to preserve the authenticity of their environment. Shooting during the golden hours—shortly after sunrise or before sunset—imbues images with a warm, soft glow that accentuates the intricate spot patterns on their feathers.
When light is sparse, such as in dense forest canopies, using a reflector can subtly bounce light onto the subject, reducing harsh shadows. Avoid direct flash that can startle the owl or create unnatural highlights. If flash is necessary, a diffuser and low power settings help soften the illumination, creating a more flattering and less intrusive effect.
Compositional Considerations for Evocative Wildlife Portraits
Composition transcends mere aesthetics; it conveys emotion and narrative. When photographing spotted owls, focus on framing that tells a story—whether capturing a familial moment perched in a nest or the intense gaze of the owl watching over its territory. Employ the rule of thirds to position the owl off-center, allowing its environment to frame and contextualize the shot.
Including elements such as branches, leaves, or textured bark can add depth and complexity. Experiment with different angles—eye level shots foster intimacy, while looking upward towards the owl perched high instills grandeur. Negative space can also emphasize the isolation or fragility of these creatures, highlighting conservation themes.
Post-Processing Tips to Enhance Details and Preserve Authenticity
Post-processing is a delicate balancing act that refines the raw capture without diluting its natural essence. Begin with noise reduction, especially if high ISO settings were used. Boost clarity slightly to emphasize the spotted patterns and the intricate textures of feathers. Adjust contrast and exposure to bring out hidden shadows or subdued highlights, enhancing three-dimensionality.
Be mindful to maintain true-to-life coloration; over-saturation can render unrealistic depictions. Sharpen selectively, targeting the owl’s eyes to impart a piercing, soulful intensity. Utilize cropping to remove distracting background elements or tighten the focus on the subject’s most compelling attributes. Retain subtle vignetting to draw the viewer’s eye inward and complete the visual journey.
Ethical Practices in Photographing Spotted Owls
Respect for wildlife is paramount when photographing spotted owls. These birds are often vulnerable and protected species. Ensure that your presence does not disturb their natural behaviors or habitats. Avoid baiting or using artificial calls that can cause stress or disorientation.
Stay informed about local regulations and protected area guidelines. Minimize time spent near nests, especially during breeding seasons, to prevent inadvertent harm. Remember, the ultimate goal is to celebrate and preserve the majesty of spotted owls—not merely to capture their image.
Photographing spotted owls is a journey of discovery, patience, and technical expertise. By harmonizing the right gear, settings, and ethical field techniques, photographers can unveil the enigmatic grace of these feathered shadows. Each successful shot not only immortalizes their beauty but fosters a deeper appreciation for the delicate balance of our natural world.