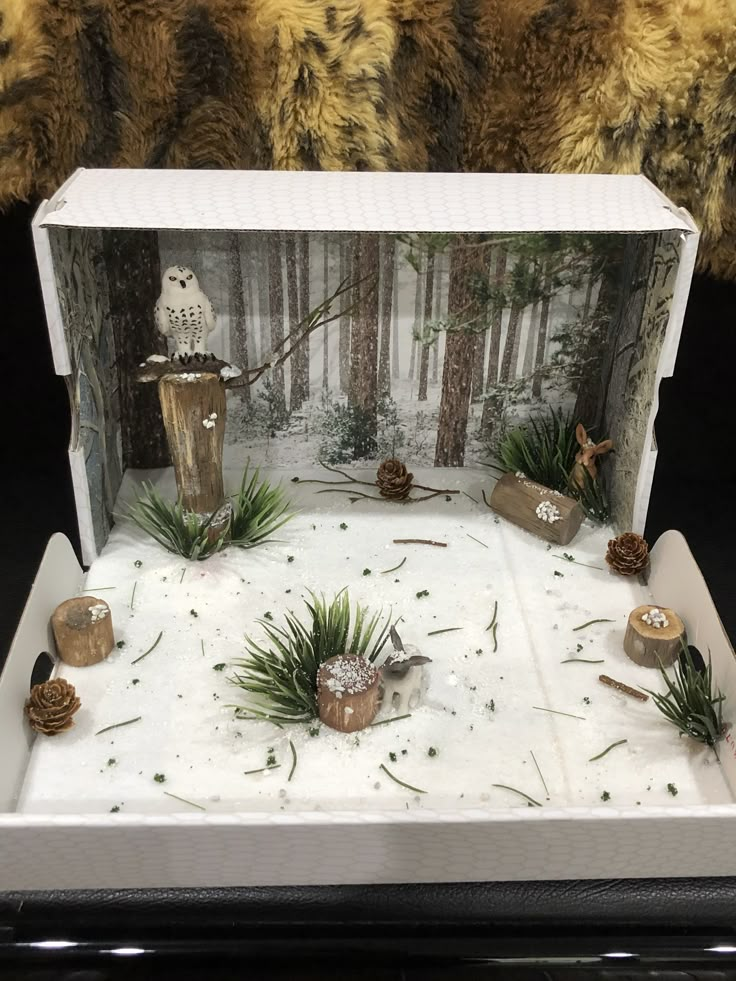
There is a quiet magic in transforming a flat sheet of cardboard into a miniature world where snow falls in slow motion and owls perch like silent sentinels upon a snowy bough. A diorama is not merely a craft—it is a portal, a frozen moment plucked from the wild and cradled in your hands. It invites the maker to become both architect and storyteller, weaving together art, science, and imagination into a three-dimensional poem. Whether you’re a parent guiding a child through the first frost of curiosity or an educator seeking a tactile lesson in ecosystems, an owl diorama becomes a living classroom where curiosity takes flight. This project transcends glue and paper; it is a meditation on nature’s quiet grandeur, a chance to hold the hush of a winter’s night in the palm of your hand.
The Allure of the Owl: Why This Bird Captivates the Imagination
The owl is nature’s enigmatic philosopher, a creature cloaked in soft plumage and piercing gaze, perched at the crossroads of myth and reality. Across cultures, it has been both harbinger of wisdom and omen of mystery—an avian paradox that whispers secrets in the dark. Its silent flight, its ability to turn its head nearly full circle, its role as a nocturnal hunter—all these traits transform it into a living metaphor for perception, adaptability, and the unseen layers of the world. Crafting an owl diorama is not just about replicating feathers and talons; it’s about channeling the owl’s spirit into your creation. You become the owl’s biographer, translating its silent language into a visual narrative that speaks without words. The bird’s presence in your diorama lends it an air of quiet authority, turning a simple craft into a miniature sanctuary of the wild.
Gathering Your Arsenal: Materials That Spark Creativity
Before the first cut is made, the stage must be set with the right tools. Begin with a sturdy base—thick cardboard or foam board serves as the foundation, a blank canvas upon which the winter world will emerge. For texture, gather crumpled paper for snowdrifts, cotton balls for fluffy clouds, and twigs or thin branches to mimic the skeletal fingers of bare trees. Acrylic paints in frosty whites, grays, and soft blues will breathe life into the scene, while a fine paintbrush becomes your magic wand, conjuring depth with delicate strokes. Don’t overlook the humble glue gun—its precision heat melts away the boundaries between imagination and reality. Add a dash of metallic glitter for the faintest shimmer of frost, and a touch of blue-tinted cellophane behind the owl to suggest the glow of moonlight. Each material is a character in your story, waiting to be arranged into a tableau that feels alive.

Designing the Habitat: Crafting a World in Miniature
The owl does not exist in isolation; it is woven into the tapestry of its environment. Your diorama must echo the quiet ecosystems where these birds thrive—dense coniferous forests blanketed in snow, moonlit meadows dusted with frost, or the gnarled branches of an ancient oak standing sentinel over a frozen pond. Begin by sketching a rough layout on your base, considering depth and perspective. Use layers of cardboard or foam to create elevation—hills of snow, the undulating trunk of a tree, or the jagged edge of a cliff. Paint the background first, blending gradients of blue and gray to evoke the fading light of dusk. Then, layer the foreground with textured materials: crumpled tissue for snow, twisted yarn for roots, or sandpaper for rough bark. The key is subtlety—each element should whisper rather than shout, inviting the viewer to lean in and discover the hidden details.
Bringing the Owl to Life: Sculpting Feather and Flight
The owl is the heart of your diorama, its presence the gravitational pull that draws the eye. Whether you choose to sculpt it from air-dry clay, carve it from balsa wood, or assemble it from pre-cut felt shapes, the process begins with observation. Study the owl’s posture—its rounded body, its feathered facial disc, the way its talons grip a branch. If sculpting, build up layers of clay, refining the shape with a damp brush to smooth the surface. For a felt owl, cut out individual feathers and layer them carefully, using a dab of glue to secure each piece. The eyes are the soul of the creature; paint them with depth, using a dark pupil surrounded by a ring of gold or amber to catch the light. Position the owl as if it has just alighted, wings slightly raised, talons curled around a branch. Its gaze should seem to follow the viewer, a silent guardian of the miniature world you’ve built.
The Art of Illusion: Lighting and Atmosphere in a Small Space
A diorama lives and breathes through its atmosphere, and no element shapes that mood more than light. A single LED tea light hidden behind a frosted plastic sheet can cast a soft, ethereal glow, mimicking the pale light of a winter moon. For a more dramatic effect, use a blue or purple gel filter over a small flashlight to simulate the twilight sky. Position your light source at an angle to create long shadows, emphasizing the owl’s silhouette against the snowy backdrop. Consider adding a faint shimmer to the snow with a dusting of iridescent powder or a sprinkle of crushed glass, catching the light like freshly fallen frost. The interplay of light and shadow transforms your diorama from a static display into a living diorama, where every glance reveals a new secret hidden in the crevices of the scene.
Educational Wings: Learning Through Creation
Beyond its aesthetic charm, an owl diorama is a powerful educational tool. As you research the owl’s habitat, diet, and behavior to inform your design, you absorb knowledge in a way that textbooks cannot replicate. Children learn about food chains by placing a tiny mouse near the owl’s talons, or about camouflage by observing how the owl’s brown and white plumage blends into the bark. The tactile nature of the project reinforces memory—each crumpled piece of paper, each painted branch, becomes a tactile anchor for the lessons learned. For older students, the diorama can evolve into a scientific model, with labels identifying different species of trees, types of snow, or the owl’s range across continents. This hands-on approach turns passive learning into active discovery, where every detail sparks a question and every question deepens understanding.
Preserving the Moment: Finishing Touches and Display
A diorama is a fleeting masterpiece, a snapshot of creativity that deserves to be preserved. Once your scene is complete, seal it with a light coat of matte varnish to protect the materials from dust and humidity. If displaying it in a frame, use a deep shadow box to enhance the sense of depth, or mount it on a wooden stand for a freestanding effect. Place it in a quiet corner of a room, where the soft light of dusk can play across its surface, or set it on a shelf near a window to catch the changing light throughout the day. Consider adding a small plaque with the owl’s scientific name or a poetic quote about the night, inviting viewers to pause and reflect. The diorama is no longer just a craft—it is a conversation piece, a reminder of the wild beauty that exists just beyond our doorsteps, waiting to be noticed and celebrated.
The owl diorama is more than a project; it is a love letter to the unseen world. In crafting it, you do not merely recreate nature—you invite it into your space, a tiny fragment of the wilderness preserved in time. As you step back and admire your creation, you realize that the true magic lies not in the materials or the technique, but in the act of creation itself. You have, for a moment, become the owl’s voice, the architect of its world, and the keeper of its silent stories. And in that quiet triumph, you’ve discovered something profound: that the smallest acts of creativity can hold the largest echoes of wonder.